Getting this blog setup
- Categories:
- Web
This post will be an overview on getting a simple Jekyll based blog working.
For this you will need any text editor and just knowing that the terminal exist, where you write words and things go boom or vroom.
My choice is Visual Studio Code which has built-in terminal support, is cross-platform and quite lightweight.
Jekyll
The framework used for setting up this blog is Jekyll, which is a static page generator. In other works you feed it a certain type of file (html templates, markdown,…), a set of rules (YAML files) and the output is an easy to maintain static blog.
The benefit of doing it this way is that the pages are as fast as long as you don’t bloat them with too much CSS/Javascript bullcrap. There are tons of templates available, of which I am using a slightly modified version of So Simple.
Installing Jekyll
The guide for installing Jekyll is really straight to the point, so going there is recommended (specially for Linux and WSL). But in short:
- Install the Requirements
- Done!
Personally I installed directly GCC and Make through Win-Builds which makes the process SO Simple ;), but you have to take care of unchecking what you don’t want to install.
Starting the blog
- Open a terminal instance (
Command Prompt,Bash,Powershell,Konsole,…) - Navigate to where the blog folder will be created
- Create the blog
cd C:/<path>/<to>/<folder>
# For base template
jekyll new <blogname> #--blank #Option to not install any default theme
cd <blogname>
The newly created blog should follow a similar structure:
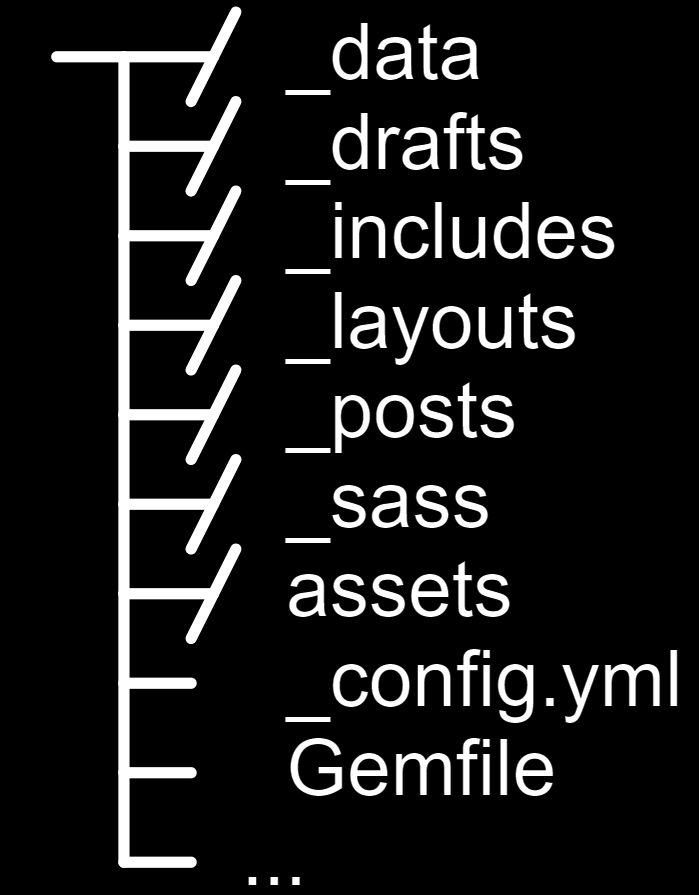
_data: Were secondary configuration files are stored_drafts: WIP posts, inMarkdownandHTMLprimarily, but not made public_includes: SpecificHTML Templates_layouts: Page typeHTML Templates_posts: Finished posts that are made public_sass/_css/_scss: Where the stylesheets are savedassets: An optional folder to organize assets under_config.yml: Main Config fileGemfile: File detailing which plugins to use (Gems - RubyGems)
Then you can preview it by executing and going to localhost:4000 on you browser
bundle exec jekyll serve
# If you don't have a theme, ignore <bundle exec>
With that you are already done, you can start writing posts and whatever you want!
Your First Post!
- Go to
_posts - Create a new
Markdownfile
Now that you are setup, a base file should look like the following:
---
title: "My Awesome Post"
description: "Damn this is easy"
layout: page / default / post /...
theme-options: <>
---

# Content Starts Here!

lorem ipsum whatever i don't remeber more than the start...
Each file will have a header in which the parsing information will be setup. Depending on the theme there will be different layout options and exclusive options to be filled. For example in the SO Simple theme, there are categories and tags that can be written to then have an easier way to seach and filter posts.
Then the content of the posts is written using either HTML or Markdown syntax, which is extremely simple and quick to get used to. The theme will take care of your content being displayed as intended, you just have to focus on making the contest as rich and straight to the point as it should.
Congrats, you have your first post already up and running!
Themes and Customization
Making the blog your own is just a process of finding the template you want and changing the CSS and HTML Templates.
- Browse for themes:
- Download it and follow the theme instructions. Most themes are basically drag and drop to start, some are a bit more finnicky.
! THE CONFIG.YML FILE ORDER OF COMMANDS IS VERY IMPORTANT
Gemfile
The gemfile details the dependencies for other plugins or Gems. You will find that some rely on dependencies or Gems that are unspecified, in most cases you will have to add them to the project and it will just work:
bundle install <gem>
bundle add <gem>
Then to make sure that the ones used are up to date:
bundle update #<THEME>
#If you have dropped the theme in your folder it is not needed to specify the theme
Layouts
On the /layouts directory there will be the base pages for the layout. The gist of it is that the HTML files will be used as templates for the content provided.
If you are not familiar with the notation, Jekyll parses Liquid based syntax to generate the final website structure. Each layout and include file will probably be riddled with {% something something %} , that is Liquid code.
Unless you want to create your own theme or modify heavily some parts of another one, you don’t really have to get into the nitty gritty of Liquid. The syntax is quite clear, with its quirks and a very annoying way to specify code to be parsed.
Includes
In most layouts, you will find Liquid lines that do the following {% include <file.html> %} . This will insert the file into the one being parsed. These include files are for specific uses that require more work to get going, are less user friendly or bring functionality to multiple layouts usually.
In most circumstances, you might want to poke around there but there is not much to gain besides knowledege, if you are using a premade theme.
Stylesheets
Coming from someone who knows jack-shit about CSS, poke around and have fun searching around the web to get specific changes. Most themes will provide a main file with some variables that can be overriden with your preferred color schemes and fonts. To make further changes you are on your own. Just one thing:
%variable : value1 value2 value3 ... : Is how variables are created in SCSS/SASS, can include other variables as values.
Hosting
I really have no clue, I have never hosted any blog or personal webpage anywhere. What I am using at the time of posting this first entry is Github Pages.
In the Repository->Setting->Pages select where, base or docs, to start searching for the entry index.html page and it will be displayed under user.github.io/ProjectName. The domain name can be customized but I don’t feel it is necessary to do for most projects.
For a dedicated page, you create a repository with the name <username>.github.io that will become your landing page.
The service is currently free and does just exactly what I need, probably even more but I currently don’t need to delve deeper into it.
Conclusions
If you don’t have a personal page, create one. It is not a thing that will increase much your visibility, but it will serve a more polished and curated view to your own work towards other people.