Math for GameDev - Part 4: Interpolation
- Categories:
- Math
Freya Holmer published some time ago some classes on the basic maths required for gamedev. Having myself not been a great math student in university I think it is important for myself to have notes in an accessible form. Hope it is useful to someone.
Interpolation
The meaning of interpolation is that, given a set of input, we obtain a value determined by an interpolation function.
interpolation(input1, input2, factor) = result
input1 / minvalue: Minimum value returned.input2 / maxvalue: Maximum value returned.factor / fraction / normalized range / ...: Value from 0 to 1 that determines the result between the other two.0 = minval, 1 = maxval
Interpolation Functions
Interpolation functions vary from implementation to others, as well as what inputs are acceptable. A value can be comprised of multiple inputs, such as a 3D vector that has 3 inputs, the result will be of the same type of the input always.
Linear Interpolation (LERP)
lerp(min, max, frac) = (max - min) * frac + min = value
min / max: values that you input to create a range from which to get a valuefrac: interpolation value with range{0, 1}value: resulting value of same type asminandmax
Inverse LERP
ilerp(min, max, value) = (value - min) / (max-min) = frac
min / max: values that you input to create a range from which to get a valuevalue: value of the same time asminandmax, from which to obtain an interpolating value between inputsfrac: resulting value which is the interpolating factor betwenmin/maxto obtainvalue, ranging from{0, 1}
Remap / ReRange
remap(inputMin, inputMax, outputMin, outputMax, value) =
((outputMax - ouputMin) /(inputMax - inputMin)) * (value - inputMin) + outputMin =
remapped_value
inputMin / inputMax: Input values to express a range wherevalueresidesoutputMin / outputMax: Wanted range in which we want to expressvaluevalue: value betweeninputMin / inputMaxthat we want to express in range{outputMin, outputMax}remapped_value: resulting value in range{outputMin, outputMax}
Bezier Curves
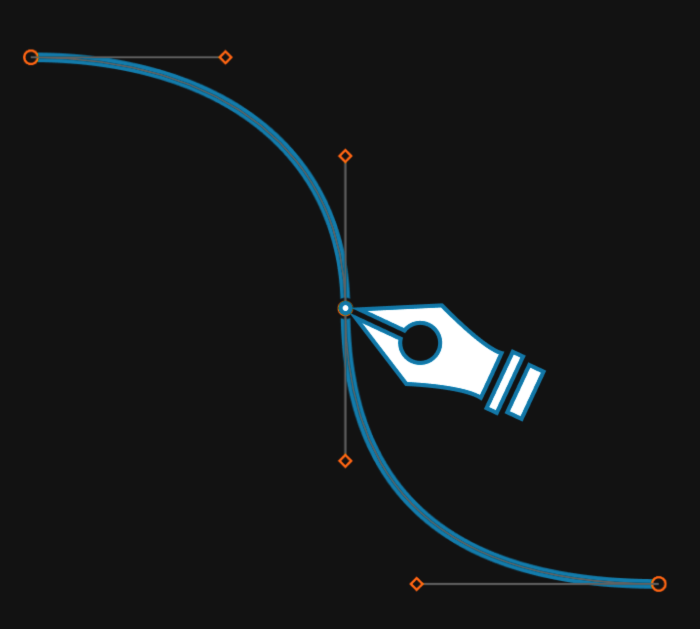
In most softwares, you have found these type of tools, in which you can add points to a line and curve them. These types of curves are called Bezier Curves and are sometimes created by nesting LERP functions.
Nesting LERP Functions
It is called nesting lerp functions, because we are interpolating between values given in order. A more accurate way of portraying these curves would be by calling a Multipoint LERP, as each point determines a part of the interpolation.
In short, we are interpolating from point to next point first, then from result to result, and so on until there are no more steps to interpolate.
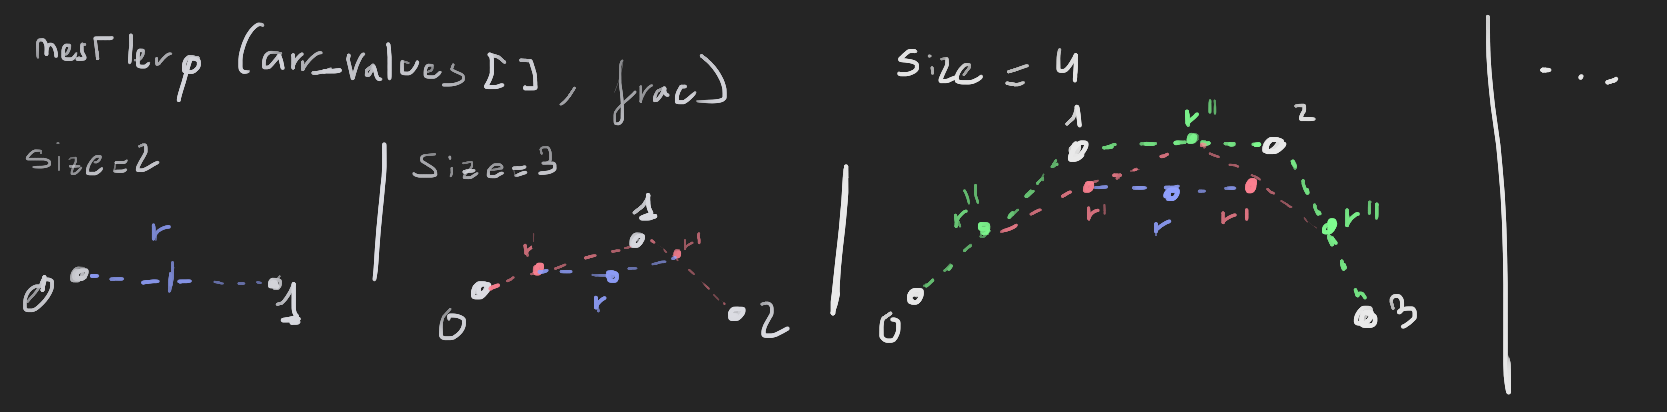
Each step can also be called as the functions such as Linear, Quadratic, Cubic,...
Basic Physics
Vectors are used widely in physics, to represent other metrics. Movement is not one dimentional and as we use more and more dimentions, we can use vectors and new functions to make use of them.
This is a short summary of some concepts.
// Δ = delta, because it is not accessible in keyboard, I use δ which is also delta but minuscule
// delta means the difference between two value. For example:
// δPos = final_pos - initial_pos
// δTime = final_time - initial_time
Linear Position based changes
- Distance
δPosition: Change of position - Velocity
δPosition / δTime: Change of position over time. - Speed
|δPosition| / δTime: Magnitude of the velocity. - Acceleration
δVelocity / δTime: Change of velocity over time. - Jerk
δAcceleration / δTime: Change of acceleration over time. - … there are more of these for Linear Position but I don’t think they are as useful.
Exercise 9: Draw a Coil
Specifying a height, number of coils and radius of the coil (width):
A - Get the Coil
// This problem boils down to generating the initial points of a coil really
// You have to go around generating points in a circle
// Then for each point you increase its height by a factor of coil and total_height

float height;
float radius;
int num_points;
int num_coils;
List<Vector3> main_points;
void GeneratePoints() {
    main_points.Clear();
    for(int i = 0; i < resolution+1; ++i)
    {
        // We transform a value of {0,1} to angle
        float angle = (i / (float)resolution) * Mathf.PI*2.0f;
        // We are using Vector3.up to wind around
        // Axis are interchangeable
        float x = Mathf.Cos(angle) * radius;
        float z = Mathf.Sin(angle) * radius;
        // Size increase of the first coil which we will repeat
        float y = (height / (float)coils) * (i / (float)resolution);
        main_points.Add(new Vector3(x,y,z));
    }
}

void OnDrawGizmos()
{
    Vector3 up = new Vector3(0, height / coils, 0);
    for(int i = 0; i < coils; ++i)
    {
        for(int j = 1; j < resolution+1; ++j)
        {
            // As we do more coils, we increase the height to get to total_height
            Vector3 height_bump = i*up ;
            Vector3 start = main_points[j-1] + transform.position + height_bump;
            Vector3 point = main_points[j] + transform.position + height_bump;
            Gizmos.DrawLine(start, point);
        }
    }
}
B - Interpolate Start and End Color
// We are not changing anything really
// Just specify a start and end color
// Interpolate given the coil we are at and the step inside the circle we are

// Inside each point add
float t = (i / (float)coils) + (j / (float)(resolution*coils));
Gizmos.color = Color.Lerp(start_col, end_col, t);
C - Make the coil follow a Torus
Now the coil does not just go in a single direction, positions are not arbitrary. Previously I did the points just for a single coil and then expanded by getting more height and reusing points.
// To create All points, we have to:
// 1- Get which part of the torus we are
// 2- Get which part of the coil we are locally
// 3- Transfrom local position to torus position
void TorusPoints()
{
// We use height as torus radius
float torus_rad = height;
// Total number of points is now resolution(points per coil) by number of coils
int new_res = resolution*coils + 1;
for(int i = 0; i < new_res; ++i)
{
// Angle of the torus we are at
float angle = (i / ((float)new_res) * Mathf.PI*2.0f;
// Position in torus, set with XY axis, could be flipped
float x = Mathf.Cos(angle) * torus_rad;
float y = Mathf.Sin(angle) * torus_rad;
Vector3 torus_pos = new Vector3(x, y, 0.0f);
// Point in the coil winding
// Get first the 0-1 value, or fractional part if the value > resolution
float frac = (i / (float)resolution) - (Mathf.Floor(i/(float)resolution));
// The transform to angle
float coil_angle = frac * Mathf.PI * 2.0f;
// And get a local coil position
Vector2 coil = new Vector2(Mathf.Cos(coil_angle) , Mathf.Sin(coil_angle)) * radius;
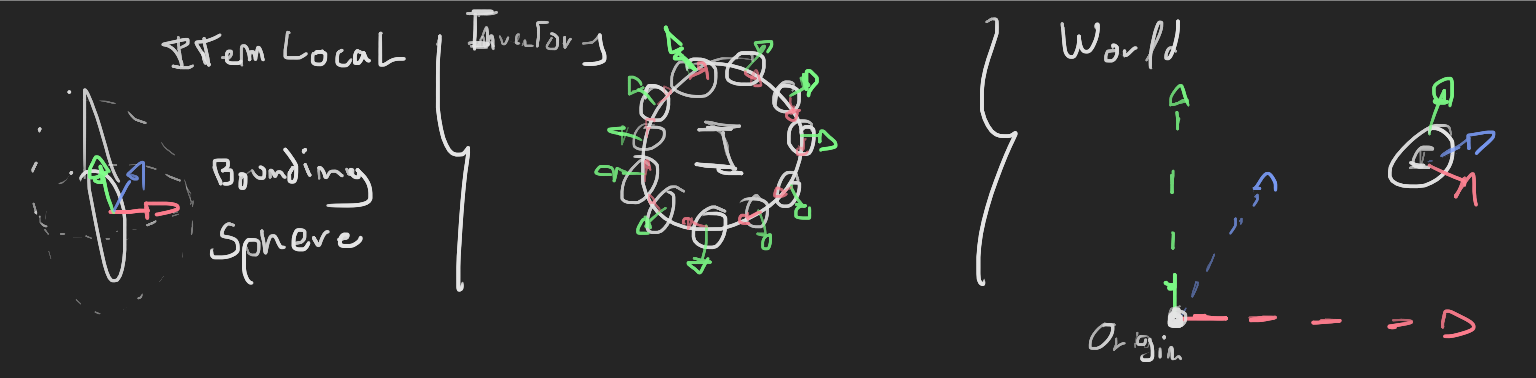
// To transform we will use the origin->torus_position vector as Right
// Then the origin->forward as our new up vector to create our local XY Axis
Vector3 right = torus_pos.normalized;
Vector3 up = Vector3.forward;
// Transform from torus_local_space, to world space
Vector3 localCoilPt = coil.x * right + coil.y * up + torus_pos;
main_points.Add(localCoilPt + transform.position);
}
}
// To draw, we use all points, no reusing
void TorusDraw()
{
for(int j = 1; j < resolution*coils; ++j)
{
float t = (j / (float)(resolution*coils));
Gizmos.color = Color.Lerp(start_col, end_col, t);
Gizmos.DrawLine(main_points[j-1], main_points[j]);
}
}
Exercise 10 - Replicate Budget Cuts Inventory
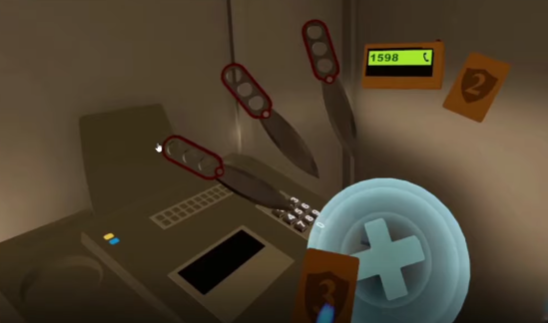
In the videogame Budget Cuts from Neat Corp (Freya’s studio), the inventory is basically a radial inventory in a controller. Items are displayed around the circumference, which’s size and quantity of items depend on a defined area/radius for each item.
The objective is to replicate it as best as possible, in 3D too.
// Knowing that we can set the pieces in a local position around a radius
// then transforming it to the space of any point we decide
// We just have to generate points along a circumference, given the radius of the items
// To display the items each point requires a local transform in each point
// First of all, I cheated a little bit
// Instead of fitting the balls perfectly in the circle
// the item radius in the inventory is approximated to make it easier
// Instead of calculating which part of the arc it projects onto
// I use the diameter to approximate the are it should cover
// It is easy and the more items you have the less the difference it makes

public float item_radius;
public int num_items;
public float inv_radius;
public List<Vector3> item_points = new List<Vector3>();

void OnValidate()
{
    item_points.Clear();
    float item_circumference = item_radius * 2.0f * num_items;
    // Amount of the circumference the items occupy
    float circumference_perc = item_circumference / (inv_radius * 2.0f * Mathf.PI);
    float start_circ = -circumference_perc/2.0f + (circumference_perc/(float)num_items / 2.0f);
    float angle_step = circ_perc * 2.0f * Mathf.PI / num_items;
    float start_angle = start_circ * 2.0f * Mathf.PI;
    // A lot of these calculations can be optimized and lowered in steps
    // but this is the whole step of getting the start of where to set items
    // and the stepping angle to add them

    for(int i = 0; i < num_items; ++i)
    {
        float angle = (start_angle + (i * angle_step));
        float y = Mathf.Cos(angle);
        float x = Mathf.Sin(angle);
        Vector3 point = new Vector3(x,y,0.0f) * inv_radius;
        item_points.Add(point);
        // Points are in the Inventory Local Space!
    }
}

void OnDrawGizmos()
{
    for(int i = 0; i < num_items; ++i)
    {
        // To transform, get the local to World Matrix and multiply the point
        Vector3 point_world = transform.localToWorldMatrix.Multiply(item_points[i]);
        Gizmos.DrawSphere(point_world, item_radius);
        // You can guess other debug draws, they are easy if you get here ;)
    }
}
B - Have Variable Item Radius
By how it is setup, not much has to change, just the generation of points, and how to step from point to point. But we have to generate the radius per each item first.
// Also in previous steps, I calculated first the stepping angle and starting angle
// Now as the stepping angle is variable, I decide to go by percentage (0-1) and then
// transform to angle

// Separate into new method for random radius
public List<float> items_radius = new List<float>();

void RandomRadius()
{
    // Get random item radius to test
    float item_circ = 0;
    for(int i = 0; i < num_items; ++i)
    {
        items_radius.Add(Random.Range(.1f, 2.0f));
        item_circ += items_radius[i];
    }
    item_circ *= 2.0f;

    // Setup the circumference, percentage of the inventory circumference used
    // and the start percentage, not in angle
    float inv_circ = (inv_rad * 2.0f * Mathf.PI);
    float circ_perc = item_circ / inv_circ;
    float start_circ = -circ_perc/2.0f;
    // We need a cumulative for the angle stepping
    // as we don't want to calculate each time all variable steps
    // and we can't do a regular step as radius is varibale
    float cumul_step = 0;
    for(int i = 0; i < num_items; ++i)
    {
        // We add the radius to approximate the change in circumference
        cumul_step += (items_radius[i] / inv_circ);
        // Transform to Angle
        float angle = (start_circ + cumul_step) * 2.0f * Mathf.PI;
        // The rest is the same
        float y = Mathf.Cos(angle);
        float x = Mathf.Sin(angle);
        Vector3 point = new Vector3(x,y,0.0f) * inv_rad;
        item_points.Add(point);

        // To make sure they do not touch, we add the next part of the radius
        cumul_step +=  (items_radius[i] / inv_circ);
    }
}
Afterwords
This series of posts are mainly for my own use. Everyone understands concepts in different ways, after a lot of time battling ways of working (which unfortunately during my studies have been based mostly on crunching) I have found out that having accessible notes on things is the best way. I am awful at remembering thigns correctly and have to check things constantly.
For any other person that does think this theme is useful to them, check Freya Holmer’s Youtube Channel, as most of her content is already uploaded there!